Starting the App
A SCENE 2go project typically consists of several folders and separate applications to launch the project for a Windows PC or a Mac.

To open SCENE 2go, click Start SCENE 2go on Windows.bat if you are using a Windows PC. Click Start SCENE 2go on Mac.command if you are using a Mac.
Opening a Scan Project
The SCENE 2go project select screen typically contains a featured project at the top, a map of the location of that project, and a list of any additional projects beneath the map.

A scan project's control buttons are located at the bottom right of the scan preview image.
-
Click the folder icon
 to load the project.
 -
Click the info icon
 to view project details.
 -
Click the map icon
 to view the project's location on a map.
You can also customize the items displayed on the project select screen.
-
Click the feature icon
 to toggle the featured project.
 -
Click the world map icon
 to toggle the world map.
 -
Click the list icon
 to display a vertical list of projects.
 -
Click the thumbnail icon
 to display a grid of projects by thumbnail.
Viewing Scans
The Overhead Map
A scan project typically opens with an overhead map showing the entire project and each scan position.

Clicking an empty area of the map will place a coordinate picker icon  whose coordinates are displayed in the map status bar at the bottom of the screen.
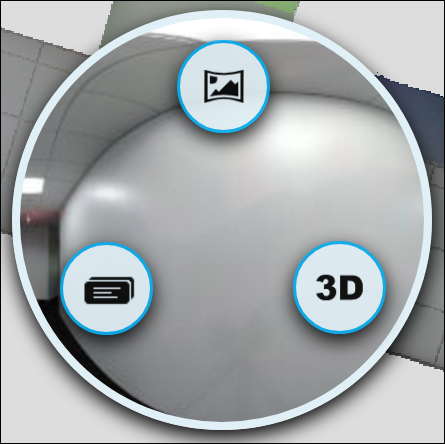
A scan icon  represents each scan position. Note: Icon colors can be altered in the settings menu. Click the icon and a circular preview of the scan will appear with menu icons.
-
Click the panorama icon
 to open a 360 degree image of the scan.
 -
Click the 3D view icon
 to open a 3D view of the scan.
Note: The 3D option may not be available depending on your hardware. -
Click the properties icon
 to see the scan's properties.
Panorama View
Click and hold on the image to rotate the camera. Click a scan icon to move into a different scan. 
3D View
Click and hold on the image to rotate the camera. Use the WASD keys to move forward or to the side. Use the R and F keys to move up and down. Click a scan icon to move into a different scan.
Note: Holding down SHIFT will allow faster movement.
Creating Measurements
You can create measurements in the overhead map, panorama, and 3D views.
Overhead Map Measurements
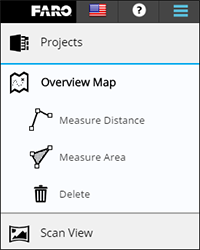
The overhead map menu displays measurement tools on the right side of the screen.
Measure Distance
-
Click the Measure Distance icon
 to measure the distance of a straight line or path of straight lines.
 - Click a start point on the map.
- Click a second point to create a line.
- Continue clicking points as needed.
- Optional: Click Enter Name on the right side of the screen to enter a name for the measurement if needed.
- Click OK when the line or path is complete.

SCENE 2go will display the distance between each point and the total distance of the path created.
Click a completed measurement for further options.
-
Click the angle icon
 to display axis distances and the angles formed by line intersections.
 -
Click the properties icon
 to display measurement properties.
 -
Click the delete icon
 to delete the measurement.
Measure Area
-
Click the Measure Area icon
 to begin creating a custom shape in the overhead map.
 -
Click a point on the map, and then click a second point to create a line.
Note: Once you have clicked a third point, SCENE 2go will show you a preview of the final line that will enclose the area. -
Continue clicking points to define the edge of the area to create. To delete a point, click the x icon
 to the right of the point in Measure Area menu..
- Optional: Click Enter Name on the right side of the screen to enter a name for the measurement .
-
Click OK to complete the measurement area.
Note: SCENE 2go will automatically generate the final line to enclose the area when you click OK.
Click a completed measurement for further options.
-
Click the distance label icon
 to display the length of each line of the area.
 -
Click the properties icon to display measurement properties.
-
Click the delete icon to delete the measurement.
Panorama/3D Measurements
-
Click the Measure Distance icon to measure the distance of a straight line or path of straight lines in scan view.
- Click a start point on the map.
- Click a second point to create a line. SCENE 2go will automatically connect the two lines.
- Continue clicking points as needed.
- Optional: Click Enter Name on the right side of the screen to enter a name for the measurement if needed.
- Click OK when the line or path is complete.
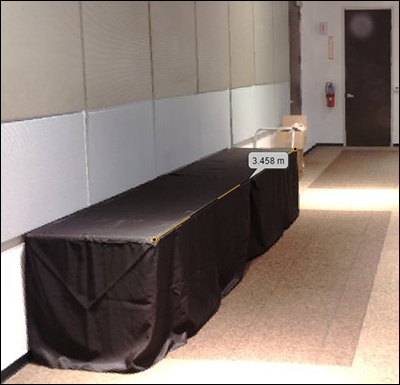
SCENE 2go will display the distance between each point and the total distance of the path created.
Click a completed measurement for further options.
-
Click the angle icon to display angles formed by line intersections and axis distances.
-
Click the properties icon to display measurement properties.
-
Click the delete icon to delete the measurement.